We all want to be able to build the life of our dreams, travel, spend more time with our family and earn money at the same time. But how can we do that?
This is a question many people ask themselves, and let me get straight to the point! One of the ways to achieve that is by creating a blog that can make you earn a living.
Are you ready to start an online business from home and monetize it?
You won’t need to do it alone, because in this post I will explain how to start a blog step by step with SiteGround, create your physical site, make it visible to the world and create the foundation to start earning money!
Do you know that creating a blog is very simple and requires no specific knowledge?
Once the site is built, you will have to start writing posts and promoting them.
It won’t be easy peasy but if you are determined and treat your business as such, then you will be able to build a successful blog and make money from it.
Are you ready? Grab your cup of coffee and take all your time to go through this post.
Why should you start an own blog?
Starting an own blog means having your own place and your own rules.
- Unlike social media, which can change its algorithm or even disappear one day or another, your blog remains intact. It is a place where you are in command and where you decide what to do and what not.
- With a blog, you can expand your business, build a brand, work whenever you want and wherever you want, connect with people that have the same interests as you, and automatically attract an audience that loves what you do.
And if people love what you do, they will also love what you have to offer.
If you can create high-quality content, you will position yourself as an expert in a certain subject and gain authority.
People think that if you start a blog, you need to be an expert.
The answer is a big NO! As long as you can help them resolve their problems or give valuable advice, you can become a successful blogger!
You just have to know a little more than your readers, give them well-researched content and they will automatically see you as an expert and trust you.
So are you ready to start your own blog?
Let’s begin with the basics.
Step 1: Choose a niche
Before starting with the technical part of creating your website, you must choose a niche you will later want to talk about.
But what is exactly a niche?
A niche is the overall topic of your blog and it is really important to have an established one if you want to have a successful business.
In this way, your audience will know what they can expect when they visit your website and you will be seen as an expert on the subject.
One of the most frequently asked questions is whether you can blog about all niches?
I am of the opinion that to be successful, you can also choose to blog in different niches.
However you should speak to a very specific kind of person.
Let’s take this blog as an example.
That Independent Girl refers to girls who would like to become independent, and therefore I focus on writing blog posts around blogging, money and personal growth.
As you see, I blog in different niches, but my focus is helping girls gain independence, economically and emotionally.
I won’t be going to blog about food or fitness.
In case you are just starting to blog, I highly recommend to niche down at least at the beginning.
What does it mean?
Let’s say you want to blog about travel.
The travel field is big, but if you can focus only on one part, for example, “low-cost travel”, you will be able to attract a well-defined audience.
So if one day someone is looking for a cheap travel destination or travel itinerary, your blog will be the first thing they will be looking for.
Moving forward, you can broaden your field, but at first, it would be better to narrow down your content, so that you know what are you doing, and who you are helping.
Moreover it will be easy to create services and products to sell later on.
Another positive aspect is that when you niche down, Google will index your content more easily and help you rank your website in the search results.
In case you are still confused about what to blog about, remember that it’s totally normal. I’ve been there!
Narrowing it down as you go along it’s completely fine.
If you can’t decide on a niche, try to think about who exactly you are targeting.
What age is the reader? Female or male? What does he/she do in their free time? What would he/she like to achieve?
Related: How to choose a profitable blog niche that makes money
What to consider when choosing a niche?
If your purpose is to build a business and make money from it, it is very important that you choose a niche that:
- has a good number of people interested in the subject
- discuss a topic you know well or are passionate about
- you can write a lot on the topic
- has people who are willing to spend some money
Remember, if you offer a solution to a problem, people will spend money to solve it.
The most profitable blog niches
There are many niches you can choose from, but some are more profitable than others.
These include:
- food
- beauty and fashion
- personal growth
- fitness
- travel
- mom and parenting
- making money
- health and wellness
- relationships.
As you can see, you have a variety of choices, but you should pick the one you are most passionate about.
It is useless to write a blog on a topic that bores you, it’s better to choose a niche where you can write for years and that makes you happy.
Related: How to choose a profitable blog niche that makes money
How to pick a niche that will be successful?
Here are some points that you can go through:
- Write down a list of things that you will never tire of writing about.
You don’t have to know the topic perfectly but you should make sure that you will conduct research and write valuable content.
- Put down things that people love to read.
Don’t make the huge mistake to write for yourself! You are writing for them, to resolve their problems and help them improve their situation.
- Conduct research on your blog’s topic.
You can do it by typing the topic of your blog on Google Trends, Pinterest, or by searching on Google for what people need help with and you can also see what other bloggers are writing about.
That doesn’t mean copying but you can take inspiration from them.
If you have decided what you would like to focus on, you will need to choose the domain and hosting of the site.
Imagine that the domain is the address of your home and the hosting is the land on which the house is built.
You can buy your domain name and your hosting separately but I recommend buying both on the same platform so that you don’t get confused when it’s time for renewals.
But more about it later.

Step 2: Choose the domain name
When it comes to choose the name of your blog, my advice is to come up with a unique name.
Choose one that reflects your business, so it will be easier to understand what your blog is about.
Related: How to choose the perfect domain name for your blog
Furthermore, it must be:
- easy to write, pronounce and remember
- short or made up of few words
- use the keyword if possible
- avoid dashes and numbers
- see if the name is available on other social media platforms too
- use appropriate extension (.com, .net, .org etc ..)
I recommend .com because people use it more and it’s more likely to be remembered.
You can use instantdomainsearch.com to see if the name you would like to use has already been taken or is still available.
Also if you run out of ideas, you could write some words you would like to be present in your website’s name and leandomainsearch will help you find a name for your site.
**Pin the name somewhere because you will need it when you will create your website on Siteground.
Let’s move on to the other step.
Step 3: Choose your hosting
There are many hosting providers out there but I personally use Siteground as a hosting platform for my blog and find it great for many reasons:
- makes blogging fast
- has extraordinary customer support, 7/24
- the StartUp plan starts at $ 3.99 per month
- manage domain and hosting from the same platform
- cutting edge in terms of security and free SSL
Related: Free hosting or paid hosting? Secret for a money-making blog
You don’t need to be a techy person if you want o create a website.
With that being said, let’s dive into how to build it step by step.
Sign up for Siteground
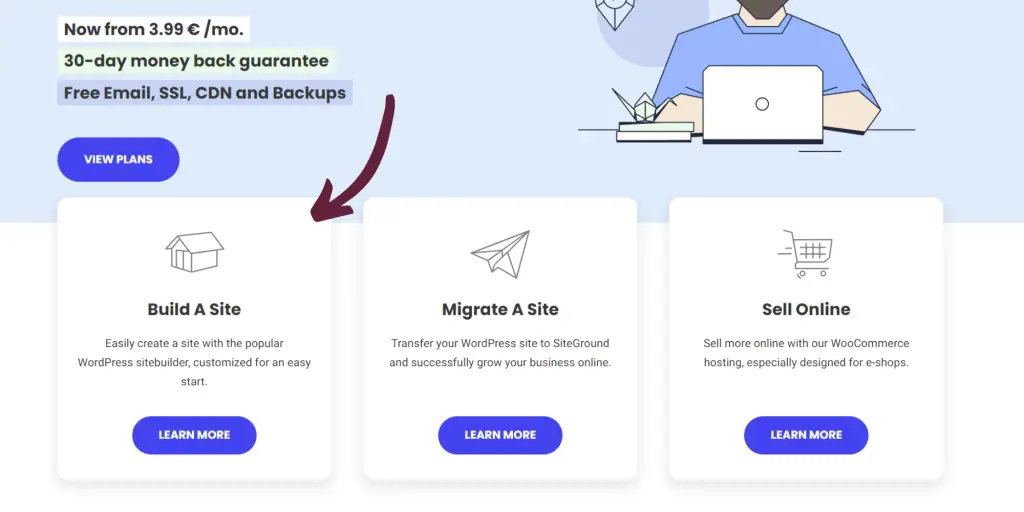
When you log into the Siteground site, you will be directed to a page where you have three options: build a site, migrate a site, and sell online. Click the “Build A Site” option.
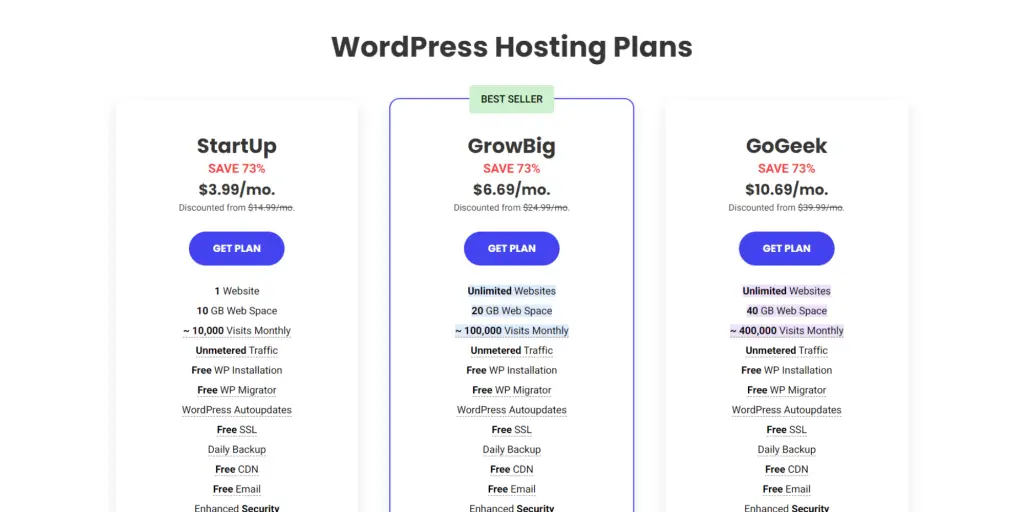
After this, you will be directed to the plans that Siteground offers: StartUp, GrowBig, and GoGeek.
I have directly chosen the “GrowBig” plan because it allows me to have more sites, and more space.
Since I’m intending to monetize as soon as possible and grow my traffic from the first year, I will not need to upgrade the plan.
But if you don’t feel like it, you can easily start with the StartUp plan.
Now you will have to write the domain name you have choosen and click proceed.
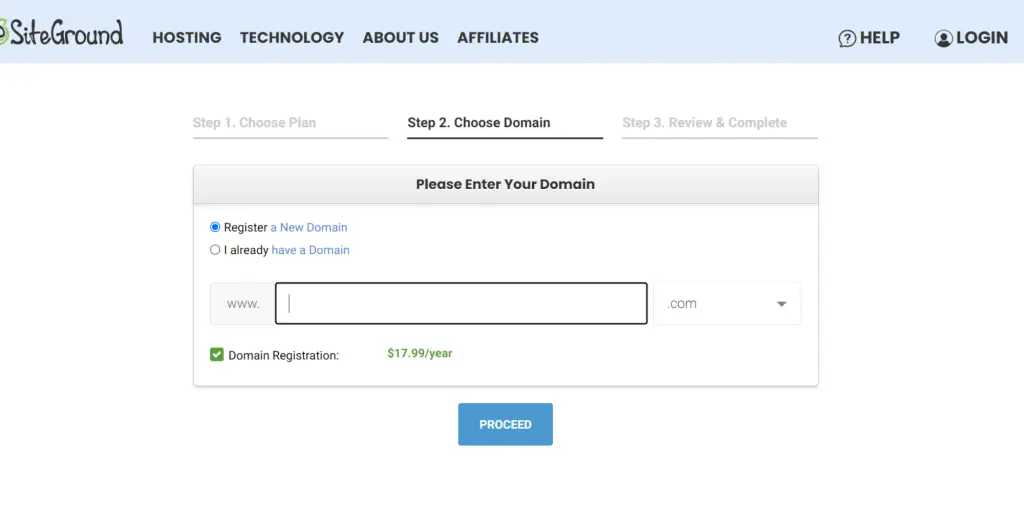
After that, you will need to create your account and fill in your payment information.
You will be asked if you would like to add the Domain Privacy and SG Site Scanner. I recommend you add directly the Domain Privacy so that people won’t get your personal info (home address, phone number, etc.) when coming to your site.
About the SG Site Scanner, you can leave it out, because it is not going to prevent any hacking. Later on, I will show you there will be a WordPress plugin for protecting your website.
After this step, you will receive an E-Mail to verify the domain name. Click that link to confirm it.
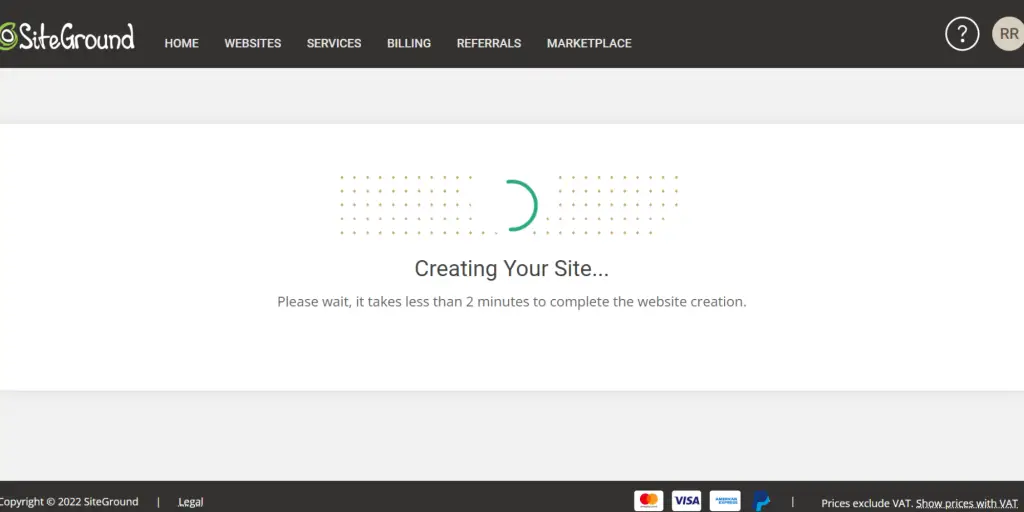
Now get back to your SiteGround to proceed with the creation of your website. Press “Set up Site”.
Click “Start New Website” and choose the application “WordPress”.
I use WordPress.org as my website builder because it will give you more flexibility in terms of customization and monetization and unlike WordPress.com, you own and have full control of your website.
A website builder is a platform on which you will construct your website, it allows you to create a blog and customize it the way you like, publish posts and also run an online store.
You will need to create your WordPress access credentials. I recommend you use a custom e-mail such as hello@yourdomainname.com that looks more professional and has a password pretty hard to get to protect your site.
Press continue and then finish.
We are almost done! We need one last step to be sure everything will run smoothly.
The first thing you want to do is secure your website by getting an SSL.
The difference between having an SSL and not having it, is going to mean that your website will have HTTPS instead of HTTP.
Having HTTPS means that your site is encrypted, which makes your website safer and more secure in terms of hacking.
And it’s all FREE!
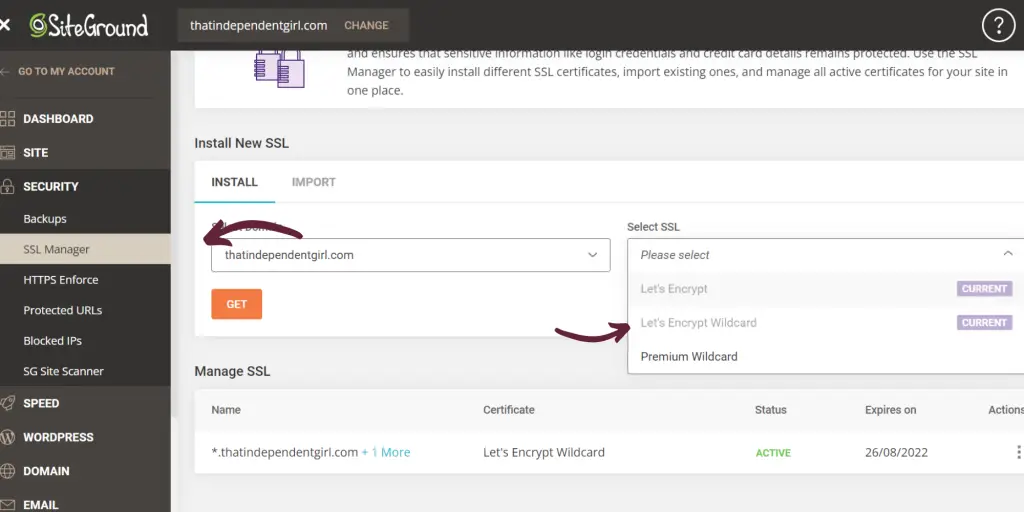
Go to “Website” and if you don’t find the “Extra” options below, simply head to “Site Tools”. You will be taken to the SiteGround’s Dashboard.
Click on Security -> SSL Manager and select Let’s Encrypt Wildcard.
Then go to Security -> HTTPS Enforce and activate it.
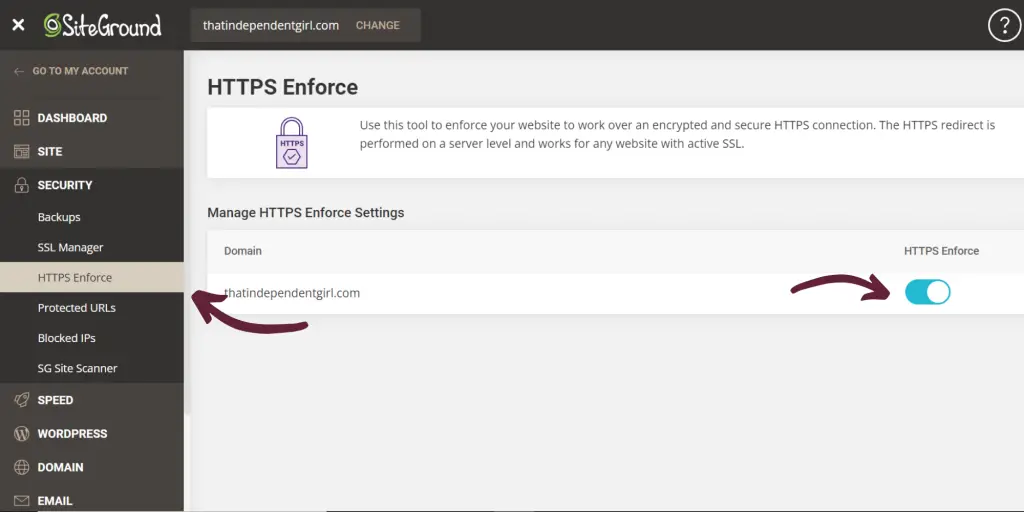
Et voilá, you are done with the “hard” part!
How to access your WordPress Dashboard?
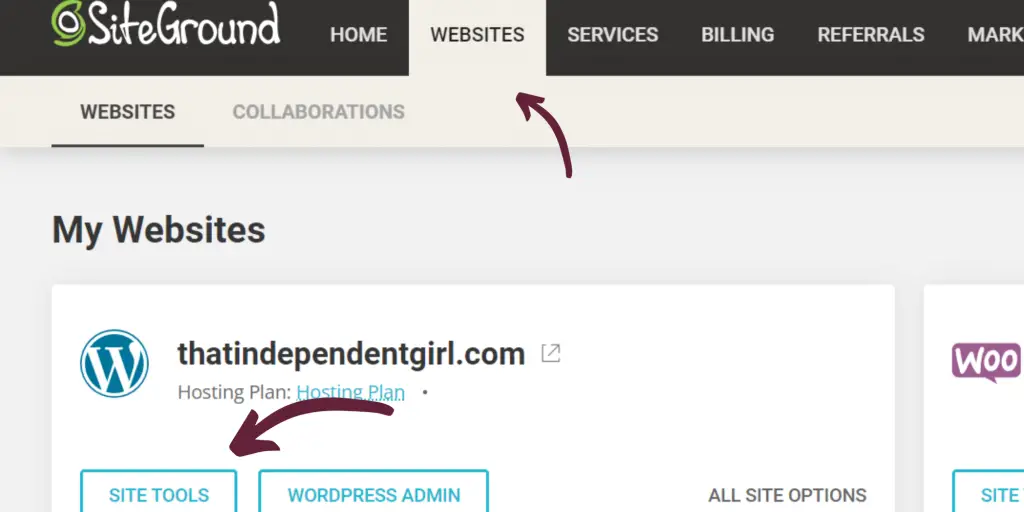
Go to “My Account” on the top left, then “Websites” and then “WordPress Admin”.
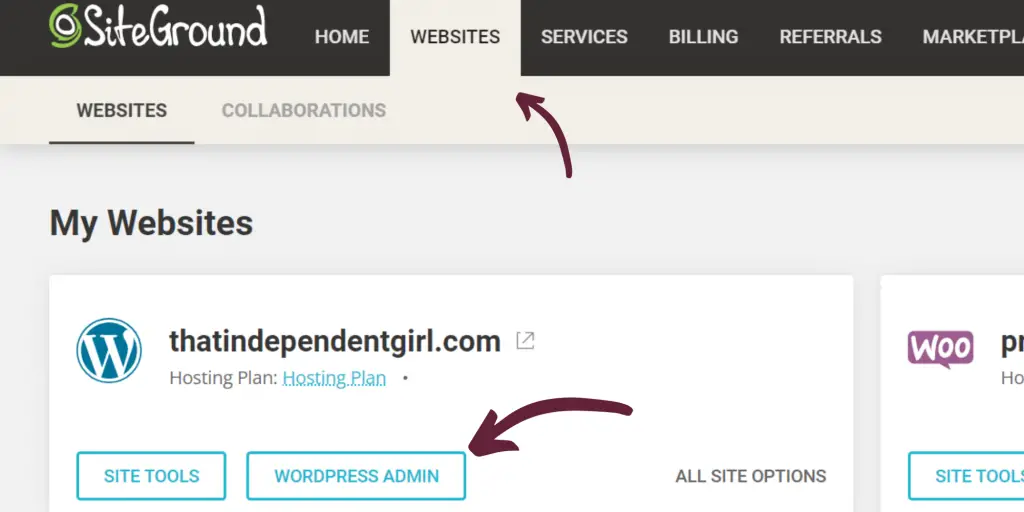
You can access your website either like this or by simply typing: www.yourdomainname.com/wp-admin on the search bar.
WordPress Dashboard
You are finally inside your WordPress Dashboard!
This is where you will have control of your site, reply to comments, edit the theme, write and publicize your blog posts that people are going to read, and much more.
Let’s set it up together!
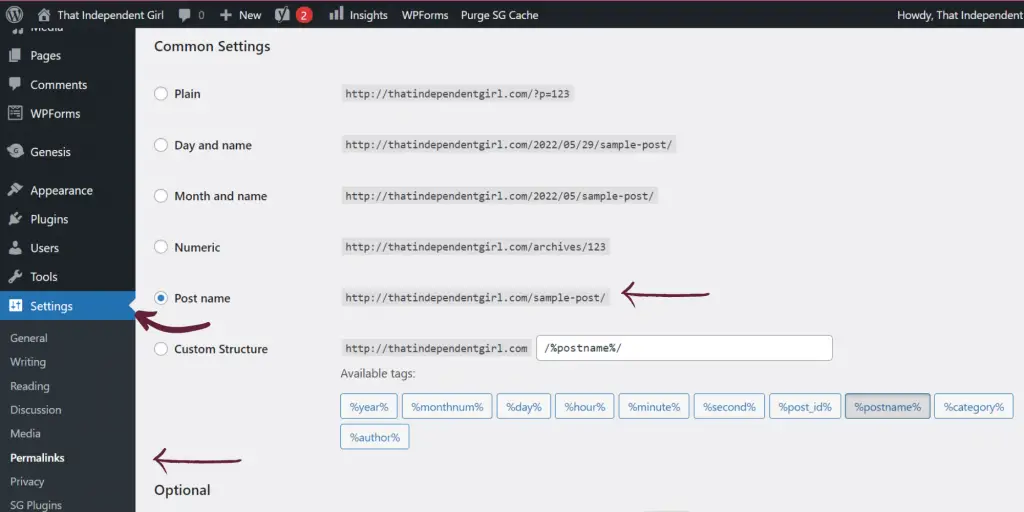
- The first thing you should do is change your permalink’s structure.
The permalink helps Google to index your content and be found on search engines by people that are searching your topics.
You see, it’s crucial when it comes to SEO (search engine optimization).
Go to Settings -> Permalinks and choose “post name”.
- Then you should change your site title to the name of your blog.
Go to Settings -> General and change your site title and your tagline, which should describe what your site is all about.
When you’re done press “save changes”.
Next, go to Users -> Profile and fill up your first and last name, because they are going to show up in the comments.
Press “update profile”.
Perfect! Now comes the fun part! How to customize your blog?
Step 4: Choose a theme
Have you ever wondered how can some blogs be so beautiful and clear to navigate? Well, this is because they’ve chosen a good theme.
The theme is the appearance of your blog.
You have two options: stay with a WordPress theme or get one from a third party.
These are the website builder I recommend:
You can find beautiful themes on Etsy and Creative Market too.
What to pay attention to when choosing a theme?
Before you buy a theme, make sure that:
- they have positive reviews
- they are mobile and tablet responsive
- they are customizable (layouts, colors, etc.)
- check if the builder can install the theme for you or if you need to do it yourself.
- live-preview the theme so you can verify if you like it
- they should be SEO friendly
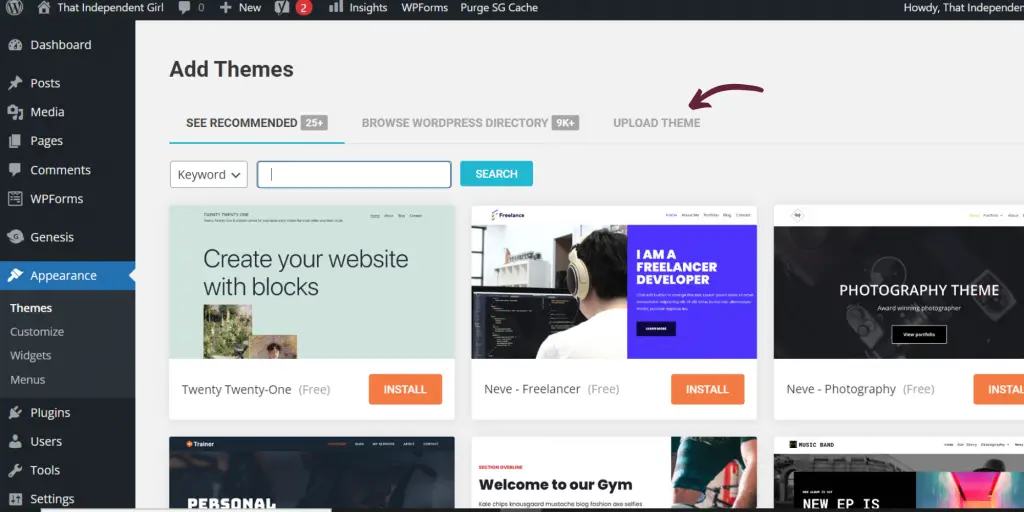
To install your theme in your WordPress, go to Appearance -> Themes -> upload the theme.
Now it’s time to start structuring your blog with important pages!
Step 5: Set up the essential pages
There are some basic pages that your blog should have before starting blogging.
These pages are going to inform your audience what your blog is about, what they will learn, who is the creator of the website, and also cover the legal and marketing aspects.
Let’s see what are the most important pages, how to create them, and what should you write there!
To create a new page, go to Pages -> add new
Contact page -> write 1-2 sentences telling your readers what they can contact you for and add your e-mail and a contact form.
It allows them to ask you questions about a topic, or to simply know more about your blog. You start to form a relationship with them.
About page -> you should explain what they can expect from you, why they should read your blog, and what they will benefit from.
You are free to add a picture of yourself and tell them a little bit about your story.
Related: How to write an about me page that attracts readers
Privacy Policy Page -> this page gives you legal protection again privacy issues. It let your audience know, that you are collecting their name and e-mail addresses when they subscribe to your blog.
It hands them confidence when they decide to give you any of their personal information and it let them know that they are protected.
Disclaimer Page -> this is another page that gives you legal protection by disclaiming the contents of your website.
It will safeguard you from possible legal charges because you tell your audience that you are not legally responsible for something.
For example, if you are blogging about nutrition you should disclaim that everything you write will not replace the advice of a doctor.
So if they follow one of your tips and don’t get what they’ve expected or it harms them, you won’t have problems.
Cookie Policy Page -> cookies are small pieces of data that people will get to their browser from your website.
They can store everything, from e-mail addresses to passwords, this is why it’s important to reassure your audience that you will keep those pieces of information safe.
Terms & Conditions -> it explains your copyrights to avoid others from wanting to copy your contents or use them without your permission.
I know that there are free templates for the above pages but it’s not a good idea to copy them as you can get sued.
I highly recommend you get them from a lawyer.
Step 6: Decide on your blog categories
If you know already what you would like to blog about, you need to create your categories.
Your categories will be the main topic of your blog posts.
When people land on your website, they would know what they can find and it would be easy for them to navigate your blog.
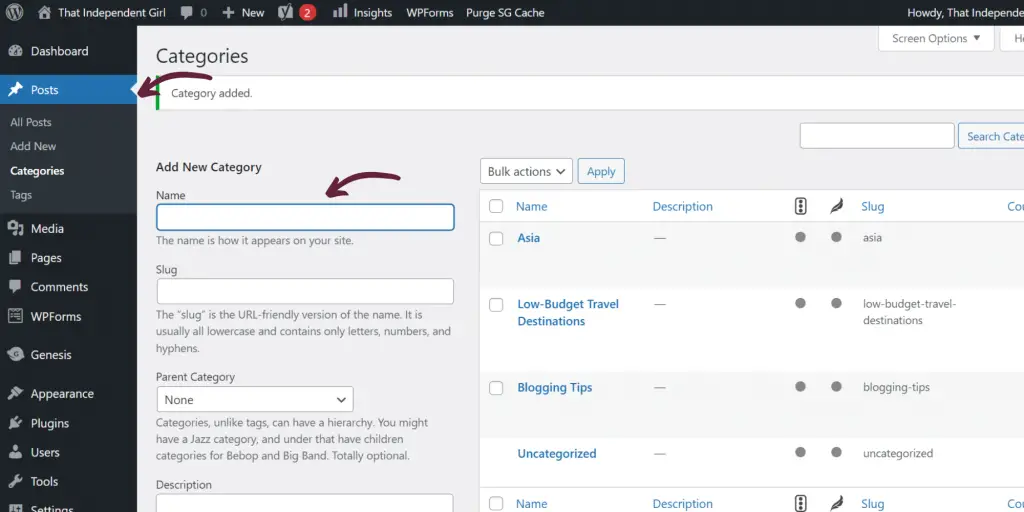
For example, if you blog about low-cost travel, your category could be “Low-Budget Travel Tips” and “Low-Budget Travel Destinations“.
Then you could create sub-categories.
Let’s say “Asia” and “America” are your sub-categories. If you create a blog post about India, you are going to publish it under Low-Budget Travel Destinations (main category) -> Asia (sub-category).
To add Categories, go to Posts -> Categories and add both categories and sub-categories.
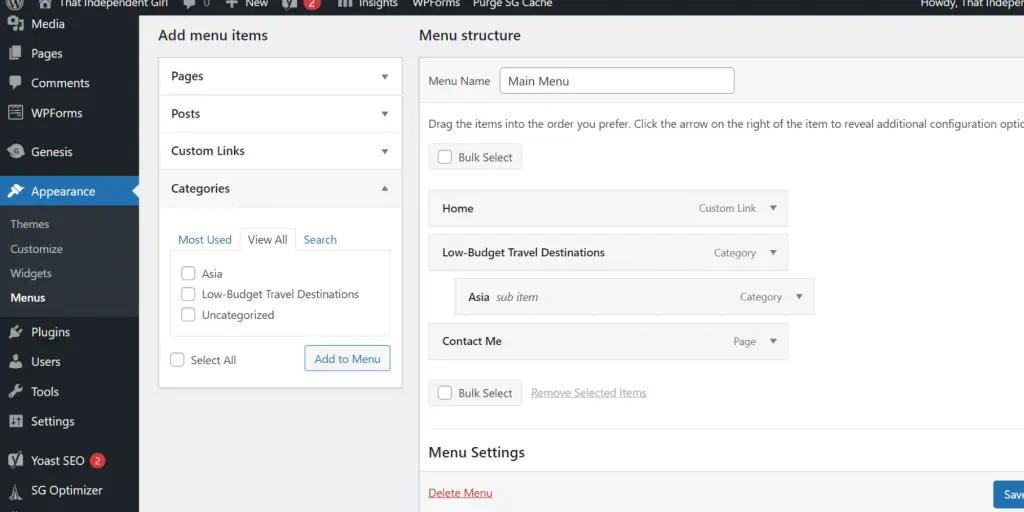
Now you want to set up your pages and your categories in your blog. How to do that? With the Menu.
The Menu is a combination of pages and categories.
Go to Appearance -> Menus
Make sure to edit the right Menu, which is the Main Menu or the Menu of the theme you’ve bought.
Then select your pages and categories and order them the way you want them to appear.
Okay, you are doing great! But you are still one step away because you have your blog but it won’t work without plugins.
Step 7: Install plugins
Plugins are a piece of software that adds functionality to your website.
For example, there are plugins that protect your site or plugins that allow you to share your blog posts on social media, or plugins that help you improve your SEO.
To start you don’t need many plugins instead! The less the better. Plugins load your site and they slow it down, so I advise you to install only the necessary ones.
MonsterInsights -> as a blogger and to develop a good marketing strategy, it is important to know who visits your website, from which country, how many visits per month your website gets, how they find it, and much more.
Furthermore, it is very important to measure the growth of your blog especially if one day you want to do brand sponsorships or monetize your site with ads. These metrics will be essential!
Google Search Console -> it helps you to monitor your presence in Google Search Results and you can discover how people find your website, which terms are they using to actually find you, and through which pages.
Yoast -> it’s for SEO and it gives you a guide on what you should improve on your post to make google like it.
WPforms Lite -> it will create contact forms to put on your “Contact Page” so that people can actually start to connect with you and it’s user-friendly.
UpdraftPlus -> for the site back-up in the rare case you can lose everything. The free version allows you to back up your entire site (theme, plugins, database, etc) manually or you can schedule it (recommended!).
Wordfence Security -> it has a free version and it protects your site from malware, etc.
Akismet -> best anti-spam protection to block spam comments and spam in contact forms.
To add a plugin go to Plugins -> Add new and type in the plugin you are looking for. Then install now -> activate.
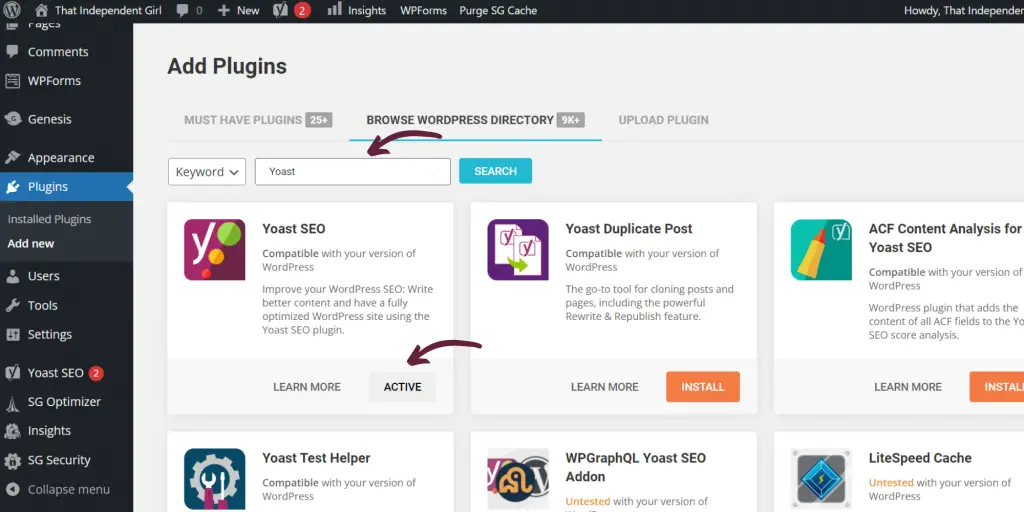
You will need to follow their own instructions to be able to get them to work.
Step 8: Start collecting e-mails right from the start
Don’t make this mistake! If you want to turn your blog into a successful one, this is one of the first things you should start doing aside from posting.
Focus on growing your email list.
Don’t think that your site is new and nobody will sign up.
Offer a freebie that can be useful in exchange for their emails.
If one day Google or Pinterest changes their algorithm, you will not be afraid of losing traffic, because there will be people who support you who will visit or buy from your site.
Step 9: Start writing your blog posts
Now you can take a deep breath! You’re officially done with the tech part!
So what comes now? Well, to be a successful blogger, you should start filling your blog with amazing content.
You can start to create your blog posts and publish your topics!
Show people how you can help them, share helpful tips and build an audience that is interested in what you do.
If you don’t know what to write, you can brainstorm some topics that people are searching for and that has also a good volume of searches.
Go to Posts -> add new
Conclusion
I know all this can be overwhelming and time-consuming, but if you stick to a plan and you are determined to grow your blog, nothing and no one can stop you!
I believe in you!
I hope this article on how to start a blog step by step with SiteGround has been useful to you and can help you start one of your own!
With much love,

